Showing posts with label COMPUTER TRICKS. Show all posts

Sunday, May 5, 2013

How to remove color from behind desktop icon text:

For windows XP and Vista

1. Right click on the My Computer, select properties.
2. Click on the Advanced Tab ( as shown in the image below ).
3. Click the on the Settings button, you will see a new window showing numerous number of options related to the GUI of windows. ( as shown in the image below).
4. As highlighted in the image above make sure to check the box which says “Use drop shadows for icon labels on the desktop“. and click Ok 2 times.
5. That’s it ! Done.

Friday, June 24, 2011

Make Bootable Windows XP Installation CD Updated With SP3

        You have to install the Windows XP first and then the service pack (sp2,sp3) in your PC. It is little bit laborious to install the service pack after each re installation of Windows XP. There are some Windows XP Installation Cd which is along with the service pack 2. But Now Microsoft has released the Service pack version 3 (SP3). And you have a XP installation CD. Then you have to install the XP first and then the Service pack 3 (available at www.microsoft.com).


To avoid the installation of  SP3 separately after each installation of the Windows XP, you can make your XP installation CD updated with the Service pack 3  making the bootable image(ISO) file of Windows XP updated with Service Pack 3.

Here is the complete procedure:

  • At first copy the total files from the XP installation CD and save it in a folder named XP (say) in the root drive, say ‘C’.
  • Download Service pack 3 From Microsoft.
  • Save a copy of the downloaded file in a folder named SP3 in the same location where the XP copy resides.
  • Open command prompt and go to the path C:\SP3>
  • Type the command given bellow:
servicepackfilename  /integrate:drive:XPfolder
In this example the command will look like
WindowsXP-KB936929-SP3-x86-ENU /integrate:C:XP

After the successful execution of the command the system files and installation files  of the folder ‘XP’ is updated with the Service Pack 3. But you can not use this  XP folder to burn the installation cd. You have to make the ISO file.

How to create the image(ISO) file??

  • To create the image file we shall use a software named Bart’s BCD software. Download the software from  http://www.nu2.nu/download.php?sFile=bcd111.zip.
  • Unzip BCD to a folder. We’ll unzip it to c:bcd for this example.
  • Download wnaspi32.dll.
  • Copy it into BCD’s bin folder (in our example, to c:bcd\bin).
  • Download  Windows XP file (5 KB).
  • Unzip it into BCD’s root folder (c:bcd in our example).
  • Make sure the subfolders are also unpacked.
  • Copy the i386 folder (in our example, from C:WinXP C:XP) into one of the following folders, depending on whether it’s Windows XP Home or Professional:
  • c:bcd\cds\wxphome\files (Windows XP Home Edition) c:bcd\cds\wxppro\files (Windows XP Professional)
  • Copy the win51ic.SPx or win51ip. SPx file here as well . Optionally, you can also copy the following files (not needed for bootable CD installation):
  • ------------------------------------------------------------------------------- 
    autorun.inf
    
    readme.htm
    
    setup.exe
    ------------------------------------------------------------------------------- 
    xp-service-pack-3-bootable Now you are ready to roll.
  • Go to the c:bcd folder.
  • Type in and run one of the following commands (depending on whether it’s XP Home or XP Pro):
------------------------------------------------------------------------------------ 
bcd wxphome       (For Windows XP Home edition)
or:
bcd wxppro     (For Windows XP Professional)
----------------------------------------------------------------------------------------------------------------
The process to make the ISO image will be started. The image file is generally located in the folder ‘Temp’ in ‘My Document’.
Collect the image file of Windows XP Service Pack 3 and burn it with Nero Image Burner. That’s all you have done to get rid from time consuming installation process of your Windows XP.

COLLECTED FROM
www.techtipsgeek.com

Sunday, June 13, 2010

COMPUTER TRICKS

How to remove Virus from USB Drives:

              One of the ways by which a virus can infect your PC is through USB/Pen drives. Common viruses such as ’Ravmon’ , ‘New Folder.exe’, ‘Orkut is banned’ etc are spreading through USB drives. Most anti virus programs are unable to detect them and even if they do, in most cases they are unable to delete the file, only quarantine it. Here are the things which you can do if you want to remove such viruses from your USB Drive
Whenever you plug a USB drive in your system, a window will appear similar to the one shown below

Don’t click on Ok , just choose ‘Cancel’. Open the Command Prompt by typing ‘cmd‘ in the run box. In the command prompt type the drive letter: and press enter . Now type dir /w/a and press enter.
This will display a list of the files in the pen drive. Check whether the following files are there or not
Autorun.inf
Ravmon.exe
New Folder.exe
svchost.exe
Heap41a
or any other exe file which may be suspicious.
If any of the above files are there, then probably the USB drive is infected. In command prompt type attrib -r -a -s -h *.* and press enter. This will remove the Read Only, Archive, System and hidden file attribute from all the files. Now just delete the files using the command del filename. example del Ravmon.exe. Delete all the files that are suspicious. To be on a safer side, just scan the USB drive with an anti virus program to check whether it is free of virus or not. Now remove the drive and plug it again. In most of the cases, the real culprit turns out to be the “Autorun.inf” file which mostly gets executed when someone clicks Ok in the dialog window which appears above. Thus the infections can spread
Folder option Missing..!!
Open Run and then type "gpedit.msc".
Now goto User Configuration > Administrative templates > Windows Component > Windows Explorer.
Click on Windows Explorer you will find the 3rd option on the right side of screen "Removes the Folder Option menu item from the Tools menu"
Just check it, if it is not configured then change it to enable by double clicking on it and after applying again set it to not configured.
I hopes that you will find the option after restarting windows.
How to Access Blocked Websites? 
Blocking access to undesirable Web sites through the use of Internet protocol filters has been a common government tactic since commercial Internet access first became available here in 1995. China and Saudi Arabia are believed to extend greater censorship over the net than any other country in the world under the pretext of information control.
        Most of the blacklisted sites in Saudi Arabia are either sexually explicit or about religion, women, health, drugs and pop culture. They even block access to websites about bathing suits. So if you want to buy something to swim in, they seem to treat that as if it were pornographic in Saudi Arabia.
        In China, webites containing sexually explicit content were among those blocked, but they also included sites on sensitive topics such as Tibet, Taiwan, and dissident activity. China also blocks access to Google News, Typepad and Blogger hosted blogs.
    But what if an innocent website is accidentally blocked by your ISP or your government. There are always legitimate reasons to visit these blocked websites. We have listed a few methods to help you access blocked websites in school, college, office or at home.
    Approach 1: There are websites Anonymizer who fetch the blocked site/ page from their servers and display it to you. As far as the service provider is concerned you are viewing a page from Anonymizer and not the blocked site. 
     Approach 2: To access the blocked Web site. type the IP number instead of the URL in the address bar. But if the ISP software maps the IP address to the web server (reverse DNS lookup), the website will remain blocked.
    Approach 3: Use a URL redirection service like tinyurl.com or snipurl.com. These domain forward services sometimes work as the address in the the url box remain the redirect url and do not change to the banned site.
    Approach 4: Use Google Mobile Search. Google display the normal HTML pages as if you are viewing them on a mobile phone. During the translation, Google removes the javascript content and CSS scripts and breaks a longer page into several smaller pages. [link] View this website in Google Mobile
     Approach 5: Enter the URL in Google or Yahoo search and then visit the cached copy of the page. To retrieve the page more quickly from Google's cache, click "Cached Text Only" while the browser is loading the page from cache.
     Approach 6: A recent Oreilly story on accessing blocked websites suggested an approach to access restricted web sites using Google language tools service as a proxy server. Basically, you have Google translate your page from English to English (or whatever language you like). Assuming that Google isn’t blacklisted in your country or school, you should be able to access any site with this method. Visit this site via Google Proxy
     Approach 7: Anonymous Surfing Surf the internet via a proxy server. A proxy server (or proxies) is a normal computer that hides the identity of computers on its network from the Internet. Which means that only the address of the proxy server is visible to the world and not of those computers that are using it to browse the Internet. Just visit the proxy server website with your Web browser and enter a URL (website address) in the form provided.
Microsoft Expands List of Formats Supported in Microsoft Office:

          Microsoft Corp. is offering customers greater choice and more flexibility among document formats, as well as creating additional opportunities for developer and competitors, by expanding the range of document formats supported in its flagship Office productivity suite.
        The 2007 Microsoft Office system already provides support for 20 different document formats within Microsoft Office Word, Office Excel and Office PowerPoint. With the release of Microsoft Office 2007 Service Pack 2 (SP2) scheduled for the first half of 2009, the list will grow to include support for XML Paper Specification (XPS), Portable Document Format (PDF) 1.5, PDF/A and Open Document Format (ODF) v1.1.
       When using SP2, customers will be able to open, edit and save documents using ODF and save documents into the XPS and PDF fixed formats from directly within the application without having to install any other code. It will also allow customers to set ODF as the default file format for Office 2007. To also provide ODF support for users of earlier versions of Microsoft Office (Office XP and Office 2003), Microsoft will continue to collaborate with the open source community in the ongoing development of the Open XML-ODF translator project on SourceForge.net.
        In addition, Microsoft has defined a road map for its implementation of the newly ratified International Standard ISO/IEC 29500 (Office Open XML). IS29500, which was approved by the International Organization for Standardization (ISO) and International Electrotechnical Commission (IEC) in March, is already substantially supported in Office 2007, and the company plans to update that support in the next major version release of the Microsoft Office system, code-named “Office 14.”
     Consistent with its interoperability principles, in which the company committed to work with others toward robust, consistent and interoperable implementations across a broad range of widely deployed products, the company has also announced it will be an active participant in the future evolution of ODF, Open XML, XPS and PDF standards.
      Microsoft will join the Organization for the Advancement of Structured Information Standards (OASIS) technical committee working on the next version of ODF and will take part in the ISO/IEC working group being formed to work on ODF maintenance. Microsoft employees will also take part in the ISO/IEC working group that is being formed to maintain Open XML and the ISO/IEC working group that is being formed to improve interoperability between these and other ISO/IEC-recognized document formats. The company will also be an active participant in the ongoing standardization and maintenance activities for XPS and PDF. It will also continue to work with the IT community to promote interoperability between document file formats, including Open XML and ODF, as well as Digital Accessible Information System (DAISY XML), the foundation of the globally accepted DAISY standard for reading and publishing navigable multimedia content.
      Microsoft is also committed to providing Office customers with the ability to open, edit and save documents in the Chinese national document file format standard, Uniform Office Format (UOF). The company does so today by supporting the continued development of the UOF-Open XML translator project on SourceForge.net, and will take additional steps to promote the distribution and ease of use of the translator. As UOF develops and achieves market adoption in China, Microsoft will distribute support for this format with Office to its customers in China.
      “We are committed to providing Office users with greater choice among document formats and enhanced interoperability between those formats and the applications that implement them,” said Chris Capossela, senior vice president for the Microsoft Business Division. “By increasing the openness of our products and participating actively in the development and maintenance of document format standards, we believe we can help create opportunities for developers and competitors, including members of the open source communities, to innovate and deliver new value for customers.”
       Microsoft recognizes that customers care most about real-world interoperability in the marketplace, so the company is committed to continuing to engage the IT community to achieve that goal when it comes to document format standards. It will work with the Interoperability Executive Customer Council and other customers to identify the areas where document format interoperability matters most, and then collaborate with other vendors to achieve interoperability between their implementations of the formats that customers are using today. This work will continue to be carried out in the Interop Vendor Alliance (http://www.interopvendoralliance.org), the Document Interoperability Initiative (http://www.microsoft.com/interop), and a range of other interoperability labs and collaborative venues.
      “Microsoft’s support for ODF in Office is a great step that enables customers to work with the document format that best meets their needs, and it enables interoperability in the marketplace,” said Roger Levy, senior vice president and general manager of Open Platform Solutions for Novell Inc. “Novell is proud to be an industry leader in cross-platform document interoperability through our work in the Document Interoperability Initiative, the Interop Vendor Alliance and with our direct collaboration with Microsoft in our Interoperability Lab. We look forward to continuing this work for the benefit of customers across the IT spectrum.”
      “The demand for a document format that everyone can use is something I hear from our customers on a regular basis,” said John D. Head, framework manager at PSC Group LLC, a Chicago headquartered information-technology and professional services consulting firm. “I am very pleased that Microsoft is enabling Microsoft Office to support ODF directly from the software. This will allow us to develop solutions that create documents that can be edited by any user, regardless of what software or operating system they use. In a world where software companies want people to select one software package for their entire user base, the reality is that different user groups and types need options. Microsoft is now enabling users to make that choice. This is a very smart move by Microsoft, and one that lets the most important person — the customer — be the winner.”
        This work on document formats is only one aspect of how Microsoft is delivering choice, interoperability and innovative solutions to the marketplace. Microsoft will continue to work with its customers and partners and the rest of the industry to continue advancing in the area. More information can be found at http://www.microsoft.com/interop.

Secretly Hide Any File Inside JPG Image File...Step 1: You will need two files - the file you want to hide and one jpg image - it can be of any size or dimensions. [If you want to hide multiple files in one jpeg image, just zip them into one file]  
Step 2: Copy the above two files to the C: folder and open the command prompt window.
Step 3: Move to the c: root by typing cd \ [if the files are in another folder, you'll have to change the prompt to that folder]
Step 4: The most important step - type the following command:
copy /b myimage.jpg + filetohide.pdf my_new_image.jpg
To recover the original PDF file, just rename my_new_image.jpg to filename.

Sunday, December 13, 2009

CONVERTING PDF FILE TO WORD/EXCEL/JPEG

Convert a PDF file to JPG – Easy Way


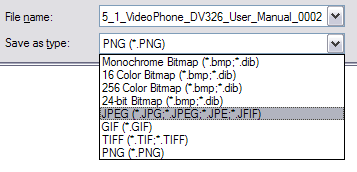
Go to ZAMZAR.COM, browse for your file and choose PNG format for the format to conver to under Step 2. PNG is another newer picture format that is slowly replacing the JPG format. Most programs that can open JPG files can open PNG. Zamzar automatically converts each page in the PDF document into it’s own PNG picture file. Now you can simply open Microsoft Paint (yes, all you need it Paint!) and choose File – Save As from the menu and choose JPEG from the drop down list of formats.
microsoft paint
That’s it! By the way, if youare interested in 

How to extract the text from a PDF document 

Have a document in PDF format that you would like to convert to a text document? Or maybe an HTML or CHM (Windows Help File) that you need to convert into simply plain text? Why might this be useful you ask? Most PDF documents are not editable and selecting the text manually can be a tedious process.
You can use Text-Mining-Tool to automatically extract text from a PDF file so that you can use it in any program freely. Or if you cannot open a PDF file because you do not have a PDF viewer installed, you can use this tool to extract the text and read the document.
Text Mining Tool is completely free and does not even require an installation, simply unzip it and run the program to use it.
text mining tool
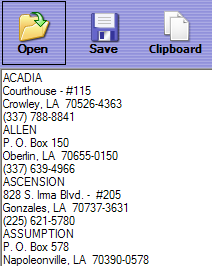
Click the Open button and choose your file that you want to convert to text. Click ok and the large window below the buttons will eventually fill with all of the text extracted from the document.
extract text
Click Save to save the extracted text to your computer. You can also click Clipboard to copy the mined text to the Windows clipboard.
For convenience, the following hotkeys can be used to perform the operations:
  • Open – F3 or O.
  • Save – F2 or S.
  • Clipboard – F5 or C.
  • Exit – F10 or Escape.
You can also use the minetext console tool to create a batch script for extracting text from multiple files. This can be useful if you have a directory with a large number of files that need to have text extracted.
The included console tool minetext has the following syntax:
minetext 

minetext  

where:

    - any file with one of the following extensions:
                  pdf, doc, rtf, chm, htm, html
   - file you want to write text mined from input file
If you’re a web designer, this program can be very useful to grab the text from a Word document without getting all of the extra microsoft office styling code included with the text.
This is a very simple program that is very simple to use! It has one basic purpose and it does a good JOB Enjoy!


How to convert Word files to PDF

Well, there is a web site called ZARZAR  and it’s a completely free tool that you can use to convert between just about any possible type you can think of! They have all the document types, image types, music formats, and video formats! This is so much better than those commercial apps that only convert between specific formats and they cost some!
And it’s terribly easy, off the main page, just browse for your file, pick what you want it converted to, enter your email address and click Convert! I tried to convert a PDF to Word and it took about 1 minute to upload the file, receive an email and download the converted file! Now that’s a cool service. So if you or your business needs to convert files, this is the place to go!
Enjoy!

Convert PDF to JPG Format – Second Way

The first thing you’ll need to do is download a free software (the only one I could find) that converts PDF documents to JPEG image format automatically. Go to the Omniformat download page and download both Omniformat v8.3 and the PDF995 app. You will need to download and install PDF995 first before installing Omniformat. Once you have both programs installed, go to your Start Menu programs, find the program group Software995 and click on Omniformat.
software995.jpg
The only annoying thing about this program is that it requires you to view some ads for about 30 seconds! However, it’s better than paying $20 or $40 for a program just to do a simple conversion! It does pop up another instance of your browser window for the web site of each of the sponsors, but it does not install any spyware onto your computer (no popup ads). Once the program is loaded, you’ll see it has a section called “Watch Folders” and then a button at the bottom titled “Start Monitoring” and “Single Pass“.
pdf-to-jpg.jpg
Basically the way it works is that you need to COPY the PDF files you want to convert to JPG format to the C:\omniformat\watch folder and then press Single Pass. The program will look in that directory and convert each page of each PDF into a separate JPG file. If you click Start Monitoring, you can keep dropping PDFs into that folder and the program will automatically convert them into JPGs as long as the program is open. Note that the program DELETES the original PDF document that it uses, so that’s why you need to COPY the PDF document to the watch folder, not move it! You should now see your converted files like below:
pdf-to-jpg-convert.jpg

Convert your PDF to a Word document

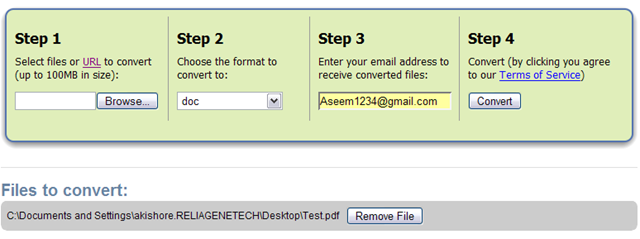
Go to Zamzar.com and click the Browse button next to Step 1 and choose your file. By default, Step 2 will be set to DOC format, but you can choose to convert your PDF to other file types such as TXT, HMTL, RTF, etc. Type in your email address for Step 3 and click Convert.
file conversion
You should receive an email within a few minutes with a download link to your converted file. I have tried out this service on some pretty complex PDF documents with text in multiple columns, multiple images, etc and have been very impressed with it’s conversion accuracy.

Convert a PDF file to Excel format

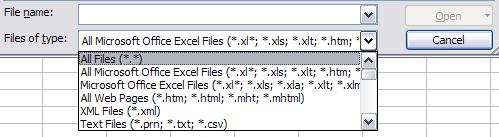
We will again follow the steps above using Zamzar, but this time choose TXT as the format you want to convert to. Unfortunately, you can’t convert straight to Excel format, so we’ll have to go through the intermediary TXT format. Once you have downloaded the TXT file and saved it on your computer, open Microsoft Excel and go to File – Open and change the Files of Type combo box to All Files.
convert pdf to excel
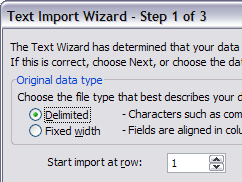
Now you should see the converted text file in the list of files. Choose it and click Open. You’ll now be brought to the Text Import Wizard. You have to open the file in this manner because if you simply right-click and say Open With Excel, all of the text for each row will appear in the first column and not be separated.
For Step 1, choose Delimited from the two options listed.
convert pdf to word
Click Next and check off the Space checkbox as one of the delimiters. Each value should now be separated by a vertical line, indicating it’s going to be in a separate column.
convert pdf to jpg
Click Next and then click Finish. You can now save the file as an Excel file by going to File – Save As. There are a few drawbacks, however, as this conversion does not always work perfectly! For example, if the original Excel sheet had a column where there was text with spaces included, each word will be separated into it’s own column! Also, you won’t see any formulas or functions that may have been in the original Excel sheet, only the text.
It’s as easy as that! You can use many other image editing programs also such as Photoshop, Corel, etc, etc, but I chose Paint because that is universally available on just about every Windows computer.
                                                                              COLECTED frm-[http://www.online-tech-tips.com]

How to track the original location of an email via its IP address

Here’s a quick how-to guide on how you can track email to it’s originating location by figuring out the email’s IP address and looking it up. I have found this to be quite useful on many occasions for verification purposes since I receive lots of emails daily due to my blog. Tracking the IP address of an email sender does require looking at some technical details, so be ready to dig your heels in!
There are basically two steps involved in the process of tracking an email: find the IP address in the email header section and then look up the location of the IP address.

Finding the IP address of an email sender in GMail, Yahoo Mail, and Outlook

Let’s go ahead and take a look at how you would do this for Google, Yahoo and Outlook since those are the most popular email clients.
Google’s Gmail
1. Log into your account and open the email in question.
2. Click on the down arrow that’s to the right of the Reply link. Choose Show Original from the list.
track emails
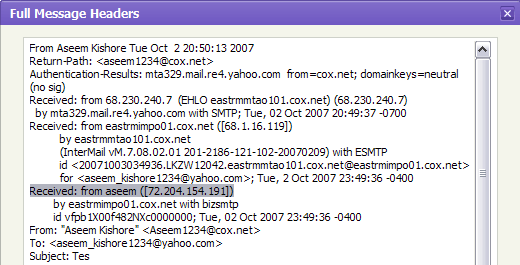
Now here’s the technical part that I was telling you about earlier! You need to look for the lines of text that start with “Received: from“. It might be easier to simply press Cntrl + F and perform a search for that phase. You’ll notice that there are several Received From’s in the message header. This is because the message header contains the IP addresses of all of servers involved in routing that email to you.
message header
To find the first computer that originally sent the email, you’ll have to find the Received From that’s farthest DOWN. As you can see from the above image, the first one is from a computer called “aseem” with the IP address 72.204.154.191. Then it was routed to my ISP’s server at eastrmmtao104.cox.net and so on and so forth till it got to your email server.
The computer aseem is my personal home computer and that’s my public IP address for my house! I’ll go through Yahoo and Outlook before talking about tracking the location of that IP address.
Yahoo Mail Beta
1. Log into your account and open the email (if you’re using Yahoo Mail Beta with the new preview interface, make sure you double-click on the email so that it opens in a new tab)
2. At the top right, you’ll see there is a drop-down option where Standard Header is selected by default.
3. Click on it and choose Full Header.
yahoo header
Again, you’ll see the same information as before, just in a different window:
message headers
Microsoft Outlook
1. Open the email in Outlook by double-clicking on it
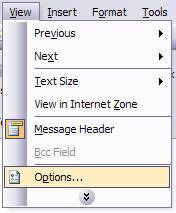
2. Go to View at the top menu (the menu options for the email, not the main Outlook window) and choose Options.
outlook message headers
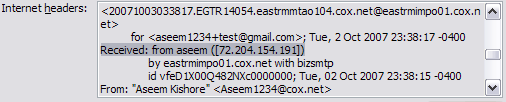
You’ll get a dialog box where you can set the message options and at the bottom you’ll see the Internet Headers box. For some silly reason, the box is very small and you have to scroll a lot, so it’s best to simply copy and paste the text into Notepad to view it more easily.
internet headers

Tracking the location of an IP address

Now that we have our originating IP address of 72.204.154.191, let’s find out where that is! You can do this by perform a location lookup on the IP address. My favorites are IP2Location and GeoBytes IP Locator.
GeoBytes gave me a big map of New Orleans, LA along with a bunch of other information about the location itself.
find ip address location
IP2Location also gave me the same information pretty much, including the ISP (Cox Communications). Of course, this is correct since I live in New Orleans!
If you want more information, you can do a WHOIS database search also. My favorite one is the ARIN WHOIS Database Search. This will give you information on who hosts that IP address and their registration information. You can always contact them to try and find more information on that particular IP address.
Have fun tracking down those emails! Questions, comments, or suggestions? Post a comment!
                                                                               
                                                                        COLECTED frm-[http://www.online-tech-tips.com]